Hair Density or Thickness? The 60 Second Check
Not sure if your hair is fine, thin, or both? This quick 60 second check helps you figure out hair density vs thickness, then turns the result into haircut and hair color choices that make hair look fuller. You will also learn how a virtual hairstyle try on can preview density-friendly shapes before you commit.
If you have ever looked in the mirror and thought, “My hair is thin,” you might be solving the wrong problem. Hair density (how many strands you have) and strand thickness (how wide each strand is) can look similar, but they need totally different styling choices. In the next 60 seconds, you will do a simple check using a mirror and your phone flashlight to figure out which one you have. You will also learn how that answer affects cuts, parting, and color placement.
Hair density vs thickness, the fast difference
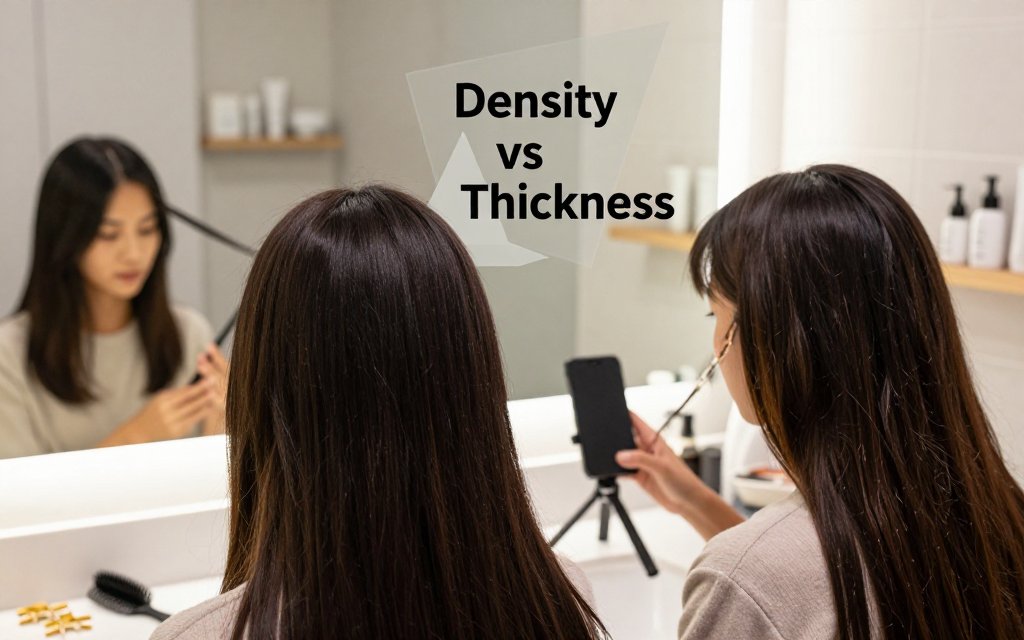
Your hair can look “thick” in photos but feel flimsy in a ponytail, or look “thin” at the part while still taking forever to blow-dry. That is why getting clear on density vs thickness is such a game changer before you pick a cut, plan a wedding updo, or commit to a new color. Density affects how much scalp shows, how big a bun gets, and whether braids look full. Strand thickness affects how hair holds a curl, how it reacts to bleach, and whether a blunt cut looks sleek or bulky. Put those two together with your face shape, and you can predict which styles will flatter you, and which will fight you.
The one sentence that clears it up
Density is how many hairs grow on your scalp; thickness is the width of one strand. Picture two people with identical shoulder-length hair: Person A has tons of baby-fine strands packed closely together (high density, fine). Person B has fewer strands, but each strand feels sturdy like a tiny thread (low density, coarse). Both can look “full” in certain styles, and both can look “flat” in others. This is the classic confusion: fine hair is not automatically low density. Many people with fine hair actually have a lot of strands, their hair just collapses because each strand is lightweight.
Strand thickness usually shows up in how hair behaves. Fine strands tangle easily, get oily faster at the roots, and can struggle to hold a curl unless you use a mousse or texture spray. Coarse strands often feel wiry, take longer to get fully wet in the shower, and can handle stronger styling (like a firm-hold gel for a slick bun). Density is more about coverage: can you easily see scalp through your part, especially at the crown, or do you mostly see hair no matter how you move it? You can have medium thickness and still be low density, which is why the quick checks below beat guessing.
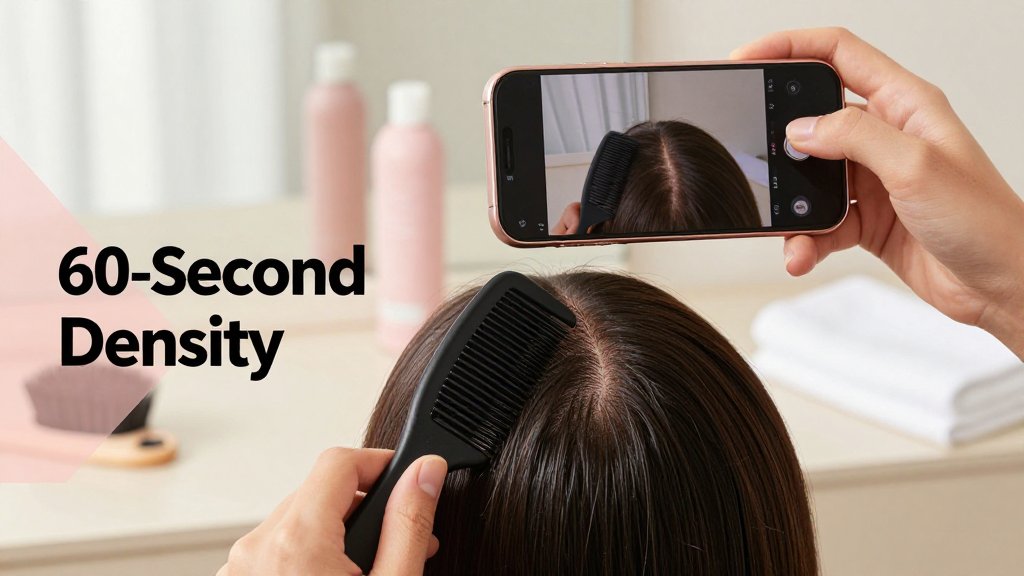
The 60 second checks, part test plus ponytail test
First, do the scalp visibility part test, and do it on clean, fully dry hair. Stand under bright bathroom lighting, then create a crisp middle part using a rat-tail comb (a messy zigzag part lies to you). Look at the width of the part at the front hairline and again at the crown, because many people are denser at the front and sparser at the crown. Next, repeat the same look using your phone flashlight angled from above your head, not directly in front of your face. If the part suddenly looks much wider with the overhead light, that is a sign your density is lower in that area, or your roots are clumping from oil or product.
Now do the ponytail circumference check. Gather your hair into a low ponytail at the nape (low pony is more consistent than a high pony for measurement). Wrap a soft measuring tape around the ponytail, or use a hair tie and mark where it overlaps, then measure that length. Practical ranges that match what most people see in the mirror: under about 2 inches often reads low density, 2 to 3 inches tends to read medium, and over 3 inches usually reads high density. Add a quick strand feel check while you are here: pull one shed hair and roll it between your fingers. If you barely feel it, it is fine; if it feels like a clear little thread, it is coarse. Layers, curls, and shrinkage can change the ponytail feel, so focus on circumference, not how “puffy” it looks.
The most common self-diagnosis mistake is judging density on an “off day.” Wet hair, oily roots, and heavy conditioners make strands clump, so the scalp shows through more, even if you are actually medium or high density. Another trap is using harsh, straight-down overhead lighting and calling it “thinning” without checking in softer light or comparing crown vs hairline. If you want a science-inspired mindset, dermatology research often uses repeatable, timed methods like the standardized 60-second hair count to track shedding. You do not need to count hairs for this article, but you should copy the idea: keep the conditions consistent, and re-check monthly instead of panic-checking daily.
If your part looks wide but your ponytail feels thick, you probably have fine, high-density hair. Treat it gently, add lightweight volume, and pick cuts that create shape without removing too much bulk.
Once you know your combo, choosing styles gets easier and more personal. Fine, high-density hair often loves a blunt lob, a sleek one-length bob, or long layers that start below the cheekbone, because those shapes keep ends looking full without making the roots collapse. Low-density hair usually looks best with strategic fullness: a collarbone bob, a soft shag with minimal thinning, or curtain bangs that add face-framing coverage without exposing the part. Coarse hair (any density) can handle bolder lines like a blunt jaw-length bob, and it tends to show dimensional color beautifully, but it may need weight removal placed carefully. If your virtual hairstyle preview ever looks “off” because the style seems too bulky or too see-through, that is often a density mismatch, and virtual try-on realism fixes can help you adjust expectations and pick a closer match.
What your result means for haircuts
Your quick check is basically a haircut roadmap. Hair density is how many hairs you have per square inch, and thickness is how wide each strand is. Those two results can look similar in the mirror, but they do not behave the same in a cut. If you want to double-check your category, the best hair density tests are a helpful reality check because density can vary across different parts of your scalp (crown versus temples, for example). Once you know which bucket you are in, you can choose a shape that either protects the ends (low density) or adds smart movement without collapsing the outline (fine strands).
Low density hair, choose shapes that keep ends thick
If you have low density, your haircut should protect perimeter weight. Translation: keep the bottom edge looking solid, not wispy. Ask for a blunt bob, a softly blunt bob (slight beveling at the ends, not layers), a collarbone lob, or a one-length cut that sits right at your shoulders. These shapes create the illusion of fullness because they keep the most precious hair where the eye measures thickness, at the ends. Minimal long layers can work if your hair is wavy or curly and needs shape, but the layers should be few, long, and intentional, not a whole staircase of short pieces.
The big do-not for low density hair is heavy layering, especially if it starts above your jaw or around your cheekbones. Lots of layers remove the hair you need most, the ends, and that is what makes the perimeter look see-through. Here is the counterintuitive tip that surprises people: going shorter often looks thicker. A chin-length blunt bob or an “Italian bob” style (full, glossy, slightly rounded) can look denser than long hair, because you are not asking a limited amount of hair to cover a long canvas. If you love length, keep it at lob territory and skip dramatic V-shapes or long “butterfly” layering that thins out the bottom.
Part placement matters more than most people think. A deep side part can reduce scalp visibility for some people by stacking more hair over one side, which is great for special events and photo days. If a deep part makes your temples look sparse or highlights recession at the hairline, switch to a soft off-center part instead (think one finger-width off the middle). For low density hair hairstyles, consider a full fringe or a soft curtain bang that starts a bit farther back, so it looks intentional, not like a few pieces pulled forward. If you wear your hair up, a blunt lob plus a slightly messy low bun often looks fuller than a high tight ponytail, which can expose the scalp.
Fine strands with normal density, texture is your friend
Fine hair versus thin hair is where people get tripped up. If your strands are fine but your density is normal, you may have plenty of hair overall, it just lies close to the head and can look flat or “too silky” to hold a shape. Your best haircut for fine strands is not necessarily blunt everything, it is controlled texture. Ask for internal layers (hidden movement inside the haircut), light face-framing around the cheekbones, and airy separation that makes the hair look buoyant. What you do not want is a perimeter that has been razor-thinned to death. Fine hair can look amazing in a modern shag-lite or a soft layered lob, as long as the ends stay visually strong.
Pair the cut with styling that gives lift without making your roots feel coated. A root-lift mousse plus a blow dry is a classic for a reason: apply mousse at the roots while damp, then blow dry upward, not downward. Use a 1 to 1.25 inch round brush for bend at the ends, especially for bobs and lobs, and aim the nozzle so the airflow follows the brush for smoother volume. Finish with a dry texture spray at the mid-lengths (not the roots) so you get grip and fullness without greasy collapse. If you have short fine hair, the same rule applies: build lift at the base, then add texture through the body, not right on the scalp.
One quick warning for fine hair with normal density: heavy oils and butters can make hair separate into strings, which can ironically make the scalp show more. If you love shine, use a pea-sized drop of a lightweight serum only on the last few inches, then brush through. Another counterintuitive tip is to stop “over-conditioning” the root area. Condition from mid-lengths to ends, rinse well, and keep your volume products concentrated where you need structure. At the salon, try saying: “I want movement, but I need a solid baseline.” That sentence helps your stylist avoid over-thinning while still giving you the soft, touchable texture that makes fine hair look thicker in photos and real life.
Color, parts, and a virtual try-on plan
If your scalp feels “loud” in photos, it is usually a contrast problem before it is a haircut problem. The more your hair color contrasts with your scalp, the more any low density area, part line, or cowlick reads as see-through. That is why two people with the same strand thickness can look totally different on camera. If you want a quick reality check on how density is typically assessed at home, including ponytail size and scalp visibility, Healthline breaks it down in hair density measurement basics. Now use a simple color plan: keep your base close to your scalp tone, add soft dimension, and choose a part that interrupts straight lines.
Hair color for thin hair, reduce contrast on purpose
Scalp shows most where hair separates, which is why the part and crown are your “high contrast zone.” A root smudge or root shadow that is 1 to 2 shades deeper than your mids can soften that line so it looks like hair, not a bright stripe. Ask for the shadow to be slightly more neutral than the rest of your color, since overly warm roots can look brassy and draw the eye back to the part. Then add lowlights, not to go darker overall, but to create depth between lighter pieces. The goal is visual layering, so the scalp is not the lightest thing in the room.
Two extremes can backfire for low density hair: very dark single-process color can create a stark, high contrast part line, and platinum all over can make the scalp look brighter and more reflective through the hair. Safer “thin hair friendly” examples look expensive because they are blended: bronde dimension with a soft root melt, beige-blonde ribbons that start below the part line, or a soft copper with darker roots and a few deeper caramel lowlights. One more detail people miss is shine. Super glossy color can make sparse spots look shinier, so finishing with matte texture helps, think Living Proof Full Dry Volume and Texture Spray or Bumble and bumble Pret-a-Powder at the crown.
At the salon, ask for a base that stays close to your scalp tone, a soft root shadow at the part and crown, and blended dimension. Skip chunky contrast, it can turn into visible stripes where hair separates.
FAQ: How do I tell if my hair is thinning or just fine?
Thinning is a change over time, fine hair is usually your lifelong strand type. Clues for thinning include a part that looks wider than it did last year, more scalp showing at the crown in overhead photos, a ponytail that measures smaller, or shedding that feels new for you. Fine hair tends to be consistent, even if it never feels “big.” Take monthly part photos in the same lighting, and repeat the scalp visibility part test at the crown. If change is recent, patchy, or paired with itch, burning, or scaling, book a dermatologist visit.
FAQ: What are the best low density hair hairstyles for everyday?
Choose shapes that keep your ends looking solid, not wispy. A blunt bob (jaw to chin), a lob with minimal layers, or a clavicle-length one-length cut makes hair look denser because the perimeter stays strong. Soft curtain bangs can work if your hairline is strong, but avoid heavy, shredded fringe that separates into thin strings. For updos, go low and loose, like a low twist or low pony with gentle crown lift, instead of high and tight styles that expose the scalp. A common mistake is copying high density Pinterest braids; try smaller elastics, light backcombing at the crown, and thicker face-framing pieces.
FAQ: Can highlights make thin hair look thicker, or worse?
Highlights can help when your hair is fine but your density is normal, because subtle ribbons add visual texture and movement. They can hurt when the highlights are heavy and high contrast, especially right at the part, because the scalp shows through as “striping.” A safe salon request is: keep my base close to my scalp tone, add soft dimension, and avoid chunky contrast at the part. For many people, a root shadow is the easiest win because it immediately softens part lines while still letting you feel brighter overall. If you wear your hair tucked often, ask for slightly deeper pieces around the hairline too.
Before you commit, preview it like you would a paint color on a wall. Start by testing parts: center part, soft side part, and a loose zigzag part, then note which one hides scalp best at the crown. Next, match that part to a shape that supports it, like a blunt lob with a side part, or a bob with a tucked-behind-ear moment on one side. Finally, audition shades and placement. With Fravyn, you can upload a photo on iOS, try 50+ hairstyles and 29+ hair colors, and compare a root shadow vs all-over brightness in seconds. Use the face shape analysis and personalized recommendations to shortlist two cuts and two color ideas, then bring those screenshots to your stylist so you are both picturing the same plan.
Ready to see what actually works for your hair before you commit to a cut or color? Try Fravyn and preview 50+ hairstyles on your own photo in seconds, so you can test parts, lengths, layers, and colors with confidence. Download the app, upload a photo, and start experimenting right away. Get the app on iOS and find your next look today.
Try a New Hairstyle Today
Preview 50+ hairstyles and 29+ colors on your own photo with Fravyn.